
Mandy had a very big birthday a couple weeks back, and I made her this tart because every big birthday deserves a Sunday morning assault of chocolate, coffee, and mascarpone cheese. Did I hear you ask for a slice? Sorry folks, this one’s not for sharing.
What this tart lacks in sweetness, it more than accounts for in richness. Put less subtly, this cake isn’t overly sugary, but it packs a fatty punch, yes it does. And lest you think only two bites will be enough, I assure you that real tart fans will have no trouble at all finishing every last bite of one (cough two) slices. And they’ll be licking the crumbs from their plates in between helpings.
I originally made a chocolate crust for this tart, which was very popular with Mandy and her family. If you’re more of a purist (though I don’t even know what that means when we’re talking coffee, chocolate, mascarpone) feel free to substitute a more traditional tart dough, or as the French call it, pâte sucrèe. That recipe can be found here, when I made a strawberry-rhubarb tart. But I digress.
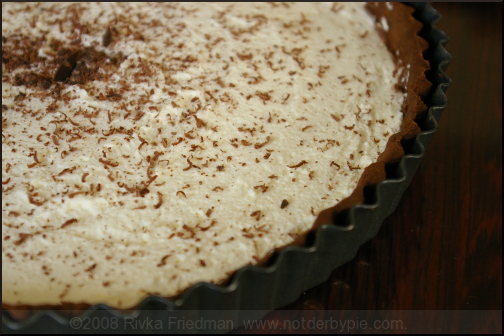
If you’ve got some serious chocoholics around or simply need to satisfy your own craving for what are obviously three of the world’s great culinary discoveries, try this one on for size. As for decoration, I grated some bittersweet chocolate overtop; you could also shave chocolate with a peeler to create longer, more curly pieces, and if you happen to have some whole roasted coffee beans on hand, those, too, would make a delightful garnish. Come to think of it, why not have both?

Chocolate Coffee Mascarpone Tart
serves 8.Tart Dough:
- 1 1/4 cups flour
- 1/4 cup cocoa (substitute with an equal amount of flour if making pâte sucrèe)
- 1/2 cup powdered sugar
- 1 stick plus 1 Tbsp. butter, chilled and cut into small chunks
- 1 egg yolk
- Blend dry ingredients with a hand or stand mixer, or better yet, a food processor. I find the processor allows dough to come together most easily.
- Add butter and blend until mixture resembles coarse meal, with little “pearls” of butter running throughout.
- Add egg yolk; blend until the dough comes together. Wrap in plastic, and refrigerate while preparing ingredients for the tart.
After about half and hour, the tart dough should be just chilled enough that it rolls nicely. Place dough between two sheets of plastic wrap or parchment paper and roll out into a circle slightly larger than the size of your tart pan. (I use a round fluted tart pan with a removable bottom, but any shallow baking pan will do.)- Peel off the top layer of plastic wrap. Hold the dough from the layer of plastic wrap beneath, and carefully turn onto your pan. Once your dough is on the pan, remove the top layer of plastic and start fitting your dough to your pan, pushing it delicately into the crevices and corners without changing the thickness of the dough too much. Trim the ends, and make a decorative outer lip if you desire.
- “Dock” your dough to the pan by spearing it with a fork in several spots, and bake for 20-ish minutes at 350, until crust is crisped. This will ensure that the crust holding the (liquidy) ingredients will still taste flaky, and not mushy. Do check to ensure that the crust doesn’t burn, though.
- While the tart crust cools, make the mousse to go inside.
Chocolate Coffee Mascarpone Mousse (adapted from Tartelette):
- 1 1/2 cups heavy cream
- 600 grams bittersweet chocolate, chopped
- 2 Tbsp. coffee
- 1 egg
- 1/2 cup mascarpone
- 1 cup heavy or whipping cream
- grated chocolate, coffee beans, or other garnish, optional
- Melt the chocolate in a makeshift double boiler (a metal bowl over a pot with a couple inches of boiling water in it).
- In a heavy saucepan, bring the heavy cream to a boil, add the coffee and let infuse for 5 minutes.
- Strain the cream through a fine sieve and pour it over the dark chocolate. Stir until completely incorporated.
- After allowing to cool for at least 5 minutes, add several spoonfuls to your beaten egg to temper the egg.
- Now, add the egg mixture to the chocolate. Reposition it on the pot of boiling water, and allow to thicken, stirring at regular intervals, about 5 minutes.
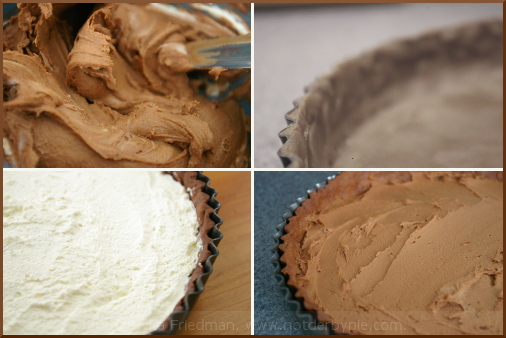
- Once the chocolate has thickened, move it from the heat to the fridge and let it cool for about 30 minutes. After it cools, mix in 1/2 cup mascarpone, and spread the mixture into the crust.
- Using a hand or stand mixer (or good old fashioned arm strength), whip up the remaining cup of cream until it holds soft peaks, and spread overtop the mousse. Top with garnishes of your choice, and serve immediately. Leftovers will keep, covered and refrigerated, for upto 1 week (if you can keep it around for that long.)
Comments on this entry are closed.
I wish somebody would make me one of those for my birthday. It looks beautiful and sounds delicious.
i wish someone would make me this for my birthday. also, i wish my birthday was tomorrow.
Okay WOW. That looks seriously delicious. Not to mention, GORGEOUS! I am all about the not too sweet but VERY rich desserts, like David Lebovitz’s Chocolate Idiot Cake.
Riv,
This looks amazing! I will have to try it out. I think I’m a fan of every single ingredient in this recipe!
OMG! Saw this on Tastespotting – looks to die for!
I love David’s chocolate idiot cake. Do you know that when he published in one of his books (I think), his publishers said people would find the title insulting, so he had to rename it? He ended up calling it chocolate orbit cake — I know, random.
This looks stunning! I love the pic (from tastespotting) the warmth of the shot and the additon of the raspberries. Yum!
This dessert looks so elegant and so does your site’s new look! I’m impressed Rivka.
Well you know what, Rivka? The first time I made the DL Chocolate Cake, I actually messed it up. The bottom of my springform was not tightly secured and water seeped into the cake. And I felt like a BIG idiot, so I’m inclined to think a rename was not a totally bad idea… Although chocolate orbit cake? Come on. Why not just title it deliciousness by the slice!
This tart looks fantastic and yummy. From now on it’s on my to-do list!!!
This looks heavenly indeed! man, now I really have a sugar rush!!:)
Wow, this tart is just decadent! Simply looking at the ingredients and I’m already drooling. Sure have to try it out some day! Thanks for sharing.